Friday, October 25, 2013

TGIF! Here's Halloween Treat Countdown No. 6 - Frankenstein Marshmallow Pops!

TGIF, the weekend is here!  Treat No. 6 is one of my favorites because not only are they super easy, but each one turns out a little unique so they really look custom made.  So here’s a great receipt for…

Frankenstein Marshmallow Pops!

List of Supplies:
Large Marshmallows
Green Candy Melts
Cocoa Candy Melts
Lollipop Sticks
Candy Eyes
Chocolate Sprinkles
Black Edible Marker
Styrofoam Block

Start by skewering the marshmallows with the lollipop sticks. You want to prepare all the marshmallows you will be using in advance. 

Next begin melting the green chocolate. Remember my past postings on how to properly microwave the chocolate without scorching. If you need it for reference visit: http://www.karamichelledesigns.blogspot.com/2013/09/have-case-of-mondays-check-out-this.html.

Once your green chocolate is melted, begin dipping each marshmallow and ensure the full base is covered.  Once you have ensure the chocolate won’t drip, push the stick into the Styrofoam block to properly hold.  Repeat this process for all marshmallows, and allow the green chocolate to dry completely.  This will take at least 45 minutes, depending on the humidity level in your kitchen. 

Once the green chocolate has hardened, begin melting the cocoa candy melts. While the cocoa is melting, pour the chocolate sprinkles into a small bowl. Once melted, carefully dip the tip of each marshmallow into the cocoa.  Only dip the very tip, which should be about a quarter way down.  Then dip the melted cocoa tip into the chocolate sprinkles and set back into the Styrofoam. Repeat this process for all marshmallows.

Next we are ready to begin placing the candy eyes. Use what melted cocoa you have left over as a “glue” to ensure the candy pieces stay into place. I found it helpful to use a new lollipop stick to apply the cocoa to the melted eye pieces.  This step is a little tedious, but take your time as the end result is worth it. Try to make each placing unique and un-uniform. 

Finally we are now ready to add the facial expressions using the edible marker. Begin with simple lines for the mouth expressions, a line for the forehead and get as creative as you wish!  Don’t forget to add those knobs on the sides of your Frankenstein’s’ head, that’s his trademark ;) 
 
Aren’t they adorable!? i can't take credit for this picture but it served as my inspiration. Follow me on instagram at #karamichelledesigns as I'll be uploading mine later this weekend!  

Hope your weekend is full of Halloween fun!  Stay tuned… more googly-eyed recipes to come!

-kara.michelle
“Beware, for I am fearless and therefore powerful.” – Frankenstein

Thursday, October 24, 2013

Halloween Treat Countdown... Treat No. 7 ~ Chocolate SPIDER Cookies, Ekkk!

It’s time for Halloween Treat No. 7!  This request comes from one very special person in my life, my baby sister Leslie Anne!  Drum roll please…..

Chocolate Spider Cookies

The list of ingredients is pretty extensive, get a pen… just kidding ;) all you will need to create these is: A toothpick, and your Favorite Chocolate Chip Cookie Dough

This one is so easy, it’s scary.  Simply pick out your favorite chocolate chip cookie dough and bake as directed.  Immediately after removing the cookies from the oven, take a tooth pick and place the tip at the center of one of the chocolate chip pieces.  Carefully drag out three lines from the center on each side.  See! You are making the “spider legs” using the warm chocolate!

Take your time and ensure to occasionally wipe off or grab a clean toothpick.  This way you’ll always have clear lines and the spiders will really pop out.  Once the cookies dry, they really will appear to look as if you baked spiders in the dough……. Ekkkk! 

While making this treat I realize an alternative that would be super fun… if you make your own red velvet cookie dough, add some white chocolate sprinkles into the mix.  The white chocolate will really contrast against the red! Serve on a cookie platter and pick up a pack of fake spiders at your local craft or dollar store.

Thanks everyone for your cute messages, means the world to me to hear from each and every one of you!!  Only 6 more to go!

-kara.michelle
“With great power comes great responsibility.” –Spider Man

Wednesday, October 23, 2013

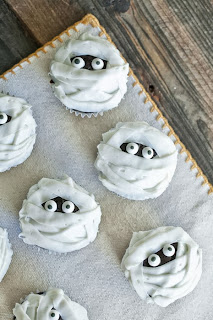
Halloween Treat Countdown Number 8 - Mummy Brownie Cupcakes!


It’s time for DIY Halloween Treat No. 8

 If you follow me on instagram, I gave a hint that the next trip would be “all wrapped up”… how many of you guessed... 
 Mummy Brownie Cupcakes
 
These are a sure crowd pleaser! Here’s your list of supplies:
-Box of your favorite Brownie Mix
-White Icing, preferably in a piping bag
-Candy Eyes or M&Ms

Begin by preparing the brownie mix of your choice and pour into lined muffin pans.  Allow to completely cool before applying the icing. When the brownies have completely cooled, begin using the white icing by making long slashes of icing in a random pattern, leaving a small area to place the Mummy “eyes” later.  I found it easy to put my white icing into a large zip lock bag and cut a corner from the bottom.  This gave me  prefect flat strands of icing rather than a piped look. 

I choose to pick up Candy Eyes I found at my local craft store, but M&Ms, Reese Pieces or any other similar type candy will do the trick!  Place a tap of icing onto each “eye” and gently press onto the brownie.  This little tap of icing will allow the candy eye to stay in place. 

Unfortunately, I didn’t get a chance to snap a picture before my family ate them all up – but the picture below I found on pinterest was my inspiration.  Aren’t they super adorable!? 
 

I hope you all are enjoying these easy, DIY Halloween goodies! I can’t wait to share no. 7… it’s really creepy!

-kara.michelle
“Everyday is Halloween, isn’t it? Well, I guess for some of us!” – Tim Burton

9 Days until Halloween! DIY Treat Countdown Special

Hello loves!

I was super upset yesterday when my blog account wasn't cooperating and I couldn't share this fun DIY Halloween Treat recipe. So today you'll get a double-dose of Halloween goodies.... so to kick it off, here's Treat No. 9!

Witch Finger Pretzel Sticks

Here are the items you will need:
1 Bag of Large Pretzel Sticks
1 Bag of melting Chocolate
1 Small Bag of Sliced Almonds

As you can see this one is SUPER easy!  You can totally whip these babies up just before a party if you wanted to. For the chocolate, to make things easier, I choose to pick up a bag of lime green melting chocolate.  However, you could also use white and add some food coloring yourself, or even an erry gray color!  You be the artist and decide ;)

I mentioned my tips on melting chocolate in the microwave on a past posting.  You can see it here and it’s never failed me but please use caution as melting chocolate in the microwave is VERY tricky!  http://www.karamichelledesigns.blogspot.com/2013/09/have-case-of-mondays-check-out-this.html

Use a deeper (microwave-friendly) bowl so you can have more space to dip the pretzel sticks in.  After your chocolate is smooth and melted, lay out a long piece of wax paper.  Begin by dipping each pretzel stick into the chocolate, covering about 80% of the pretzel.  Since we are adding detail, it’s important to only do a series of about 4 to 5, then begin the detail work as the chocolate will begin to harden quickly.  Take one sliced almond piece, and push at the dipped end of the pretzel to make the witch “finger nail”.  Next, take a toothpick and begin making slices into the melted chocolate to make knuckles and finger indentions. Take your time and try to keep your hand steady in the process as the chocolate can move around a lot I still pretty warm.  Continue this process until you have made all the Witch Fingers your heart desires!
 
Don’t they look creepy!?
 
 
As I stated earlier, get creative with the color chocolate you pick out!  A gray color would be really fun to use as Vampires Fingers!

Stay tuned later today for round two as I’ll be sharing Treat No. 8!
 
-kara.michelle
“You had the power all along my dear.” –Glinda, the Wizard of Oz

Monday, October 21, 2013

10 Day Countdown Special – DIY Halloween Treats!

10 Day Countdown Special – DIY Halloween Treats!

There’s only ten days left until Halloween!  Have you decided what you will be passing out to trick-or-treaters?  What about the dessert you are suppose to share at the costume party? Don’t fret my little pretties, I’m here to help! For the next ten days, I’m going to share 10 simple DIY Halloween treats you can make at home.  And who doesn’t love home-made goodies over store-purchase candies!? I’ll start the countdown special with a really easy one that can be ready at the blink of an eye…
 
Witch Hat Cookies! 
 
Here are the supplies you will need:
-Pack of Keebler Fudge Stripe Cookies
-Pack of Hershey Kisses
-Frosting (color of your choice)

Simply place the cookies top-side facing down on a cookie platter and unwrap the Hersey kisses.  I choose to purchase a lime green frosting, but any color your heart desires will work!  With a icing piper, place a dot of icing in the center of each cookie, then simply press a Hersey kiss on top.  DONE!  Now who doesn’t have time for this last minute, adorable treat?  They are bit-sized, budget friendly and kid approved. 


Now the real question is... can you make a tray of Witch Hats before eating all the Hersey kisses ;)

enjoy!
-kara.michelle

Fashion Icon Monday!

It's Monday - and you know what that means! It’s time for Fashion Icon of the Week!

Let’s be honest… has Sofia Vergara ever looked anything less than absolutely stunning?  I love her spiteful attitude and the fact that she’s always wearing a huge smile.  Many don’t know that Sofia was diagnosed with thyroid cancer in 2000, and underwent intensive radiation therapy after having her thyroid completely removed. But that’s what I love about her, you’d never know how sick she once was because she takes care of herself and always looks fabulous. I love her positive outlook on life.
 

I feel in love with Sophia’s style just recently when she wore this mermaid style, green sequined gown designed by Zuhair Murad to the 2012 Emmy Awards.  Doesn’t she look amazing?


Just watch one episode of Modern Family and you’ll fall in love with this Columbian beauty.  Her street style is adorable too… loving the dark skinnies, nude platform stilettos and flowly purple top. 


Hope this helps to kicks off your week with some style inspiration! Stay tuned for some last minute Halloween dessert tips and tricks ;)
 
xo
-kara.michelle
"I’m fearless, I don’t complain. Even when horrible things happen to me, I GO ON.” – Sofia Vergara

Friday, October 18, 2013

Friday Favorites!

Yay, it’s the weekend! Are you as excited as I am??
I’m was super happy when I stepped outside this morning as we finally have some cooler weather and no humidity. It’s going to be a great weekend in Nola, I have two very special friends celebrating birthdays and lots of local festivals are happening.  The fall is truly my favorite time of year as so much is going on in my wonderful city. 

I’ve been inspired by so many fellow bloggers lately that I’ve decided to join the blogger world bandwagon and start doing “Friday Favorites”! Here are some things I’m really lovin’ on lately…


Fringe
Ok, fringe this season is everywhere… boots, bags, necklaces, tops, sweaters and I’m completely obsessed.  A new adorable local boutique named Candy Apple just opened near my home and they have had the most adorable fringe items! If you aren’t local to the New Orleans area, do yourself a favor and check out their stuff at www.facebook.com/shopcandyapple  This week they advertised fringe clutches with adjustable straps that are all the way from India.  Can you say, gorgeous!?  Look at this detail…


This Quote
I absolutely loved this picture when I came across it on pinterest. We often forget to stop and appreciate the overlooked, ordinary things around us too often.  This is a little something I’m working on… appreciating the beauty in everything around me. 

 Purple Lips
I’m loving dark purple lipsticks for the fall. Unfortunately, finding one that meshes well with my fair skin and blonde hair has been really difficult. Leave it to MAC! After much help from the MAC artists, I picked up Rebel, in the Satin Lipstick line for $12 and it’s the perfect shade.  

 
No-Bake Desserts
I love to take my time and bake something from scratch that’s really rich… but let’s be honest, my schedule is just crazy lately and I simply don’t have the time. No bake desserts are so easy and they are the perfect last-minute party treat! The past couple weeks I’ve been playing around with some Halloween inspired treats and my favorite thus far is white chocolate dipped Oreo cookies! Just pick up a pack of Oreos and dip them in melted white chocolate. Allow them to dry on a piece of wax paper, but while the chocolate is still wet, get creative and add a touch of decoration! These are a guaranteed crowd pleasure… give it a try!

Well my friends, cheers to the weekend! Hope it's a wonderful one.

xxoo
-kara.michelle
"There is excellence all around you, you need only be aware to stop and savor it.” -Chef Gusteau, Ratatouille

Monday, October 14, 2013

Style Icon of the Week - SJP!

Hellooooooo, it's been WAY too long since my last post! I really need to start dedicating more time to my sweet little blog. First of all - THANK YOU soooooooo much to all my readers for all the recent sweet emails filled with compliments and encouragement. They are so thoughtful and I greatly appreciate each of them more than I can say.
 
So as you may have noticed, I've really been getting into fashion bloggers lately. I'm obsessed over piecing together unique outfits, so I decided each week to share a "Style Icon" post, showing pictures of someone's style who really catches my eye.  And to kick it off, I couldn't think of anyone better than the lovely, Sarah Jessica Parker....


I think Sarah has this adorable way of balancing her glamorous celebrity lifestyle to her down-to-earth hands on mom lifestyle. She really pushes the boundaries of what's acceptable, and I love that about her. Why? Because that's how she catches your attention!

When attending a red carpet event, she always looks elegantly stunning. Every inch of the outfit, her accessories, even her hair and makeup complement each other. At least in my opinion that is ;) Look how amazing she looks in this Valentino gown. This picture was taken at the 2012 NYC Ballet Fall Galla. Being a ballerina, this would be the type of dress I'd love to wear after a performance. It's flowy, the pale color reminds me of my pointe shoes, and the hair in an elegant up-do resembling a bun. Simply perfect!


I personally think we see Sarah's true style when we catch her walking her kids to school on the streets of New York. Many fashion critiques say she looks as if she rolls out of bed, finds something to throw on and rushes out. I completely disagree! Her playful miss-matches are what I find most intriguing. And as shown below, she's back to rolling up one pant leg again this fall.


Maybe it's because I love Carrie from Sex and the City so much and to me, Jessica will always be Carrie... but like her fashion style or not, you can't deny that she's grab your attention a time or two!

Hope you enjoyed!  And I promise I won't stay away too long this time ;)

-kara.michelle
"I like my money right where I can see it... hanging in my closet." ~Carrie Bradshaw

Friday, October 4, 2013

Military Jacket Obsession

hello loves,
It's been way too long since my last blog update - have you missed me? Life has certainly been a busy slice of heaven lately. Family is in town, work is going great, I've been craftin' and designing like crazy... ahhhh, love it all!

I'm really into the military jacket fall fashion trend. You see them everywhere, and I love how versatile the fashion industry is advertising them. From a dressed up look paired with a cute black cocktail dress to a casual weekend look, the military jacket is a fall must-have wardrobe staple.
 ..the military jacket craze ..
I've been scouting online and local stores to find the perfect one to mesh with my fall wardrobe. Isn't this style cute from XXI? I really love the gold stud details...


Look how playful these outfits are... I love how the masculinity of the jacket compliments the girly lace pencil skirt.  It's such a unique contrast. 


So the next time a military-inspired jacket grabs your eye, pick it up! And don't doubt you have tons of outfits to pair it with. Keep it simple with a loose shirt, black leggings and your favorite boots - or get creative and pair it with a flowy dress and a pair of suede wedges. The possibilities are endless!

Stay tuned for my next favorite fall fashion trend - the Statement Necklace ;)  but until then, I'll leave you with one of my favorite quotes from the lovely Blake Lively. Her outlook on what others will say or think is amazing because she simply doesn't care... and I just love that.

Hope your weekend is amazing!

-kara.michelle
"I never think about how other people will respond to the way I dress." ~Blake Lively